Showing posts with label house. Show all posts

Friday, November 28, 2014

Billy Built-ins: Filling the Shelves

We have a finished product, which includes lots and lots of empty shelves (a homeschool mom’s dream) and happy helpers posing in front of it.  And, a picture of my biggest helper and a photo bomber.


On the far left, we have our board games. Well, most of them anyway. Some of them are still hidden away in a cupboard. In the cute old fashioned trash cans (from IKEA), we have Lego and Wedgits.


Above the computer area, I have teacher supplies, so, I put them up a little higher to discourage the kids. Behind the computer I have a stick on blackboard. I love this. One day, I hope to have blackboard covering the entire area behind the computer, but I’m not sure that will ever actually happen. In the meantime, this will have to do.


Next we have shelves containing part of our collection of fiction. We have stickers on the binding of the fiction books to make it easy for the kids to put them away. The books are sorted by reading/interest level and each shelf has a different color sticker. On the bottom shelf, each of the kids has a magazine holder and a binder. 

On the top shelf on the right, we have oversized books and the books I currently use for teaching.  The shelves beneath that hold various craft supplies, coloring books, activity books and white boards. Apparently, I didn't take a picture of these shelves right after we filled them, because these shelves are definitely showing signs of use, compared to the other photos.


All the cute buckets and containers hold various school supplies, craft supplies, etc. This is the beginning of the non-fiction collection (which continues on beyond the built-ins). Yes, I have them all filed using the Dewey decimal system. I found myself buying books I already had or just not being able to find books I needed. So, years ago, I broke down and spent the time to catalog my books. I’m so glad I did.


One last shot of the awesome lights on top of the shelves. I do keep things on top of the shelves as well. 


And, a picture of the whole shelf setup.


Tuesday, September 23, 2014

Built-in Billys - Part 1

This post is late in coming and I haven’t had the time to get all the information into one post, so we’ll have to go with installments.

We are blessed with an awesome great room in our home. Our kitchen, dining room and school room are all one big room. I had this huge amount of wall space in the school room. While, it is great for hanging maps and such, I knew it would look so much better and be more useful if we had built in bookshelves.


Quite honestly, it wasn't hard to make it look better. One of our “bookcases” was an old entertainment center with no sides. My husband made it in high school, so we’ve been carrying it around all these years (it’s partner is in my bedroom closet), but we finally gave it up for this project. We put it on the street with a “free” sign and it was gone in an hour. And, junk always ended up all over the hearth. Just being real, here.


I didn’t really have the expertise to start from scratch, but found that there are many blogs and tutorials for built-in Billy bookcases. A couple of the blogs I referred to most often were:


The IKEA hackers page actually has the exact layout that we used for our shelves. I like that the wide bookcases were interspersed with small bookcases to break up the monotony. And, the area for the TV in the blog worked perfectly for our schoolroom computer.

We host a home fellowship every other week, so squeezing in a home renovation in our meeting room was tricky. I purchased the shelves from IKEA, and, when, we had a 3 week break between meetings, I got started! Books went into boxes and the school table went onto the back patio. This is one of those times I’m thankful for beautiful Southern California weather in November.


The first task was to put together the IKEA bookcases. The kids loved helping with this.


Next, we removed the baseboard along the wall we planned to place the shelves.


After they were all put together, we set them against the wall to make sure they would fit. 


In the next post, I’ll get into the details of how we installed the shelves.

Sunday, February 10, 2013

The Steps of a Good Man

For several months, I've been thinking about writing scripture on our stairs.  You know how you see those clever pinterest posts or other internet ideas that you think are great, but you never get around to doing them?  Well, I finally got around to doing this one.  First, I had to decide which scripture to do. As I was perusing the Bible for a good candidate, I came across the perfect scripture. It is one of hubby's favorite scriptures and it's perfect for the stairs.

I wanted to surprise my hubby. So, when he went to a Bible study conference for a few days, I knew this was my chance. Of course, this was a late night project.  I had to do it after the little guys were in bed.  So, sometime after midnight, I started painting scripture. When I got done, I realized two things: 1 was that I needed to make the words on the top step higher up so they could be seen from the ground level; 2 was that I had skipped a line. O.o So, after scrubbing off almost half the steps, I redid it.  And, I must say, I was very happy with the final results.

This is the view from the front door.


 Ps 37:23-24

23 The steps of a good man are ordered by Yahweh,
And He delights in his way.
24 Though he fall, he shall not be utterly cast down;
For Yahweh upholds him with His hand.


Sunday, February 5, 2012

The Pretty Stuff is Up!

Disclaimer:  These are the “House Beautiful” pictures J  I did move several things off the kitchen counter to make the pictures look better.  So, if you show up at my house, the kitchen will look great (even if it is messy), but you won’t likely ever see it look like this J

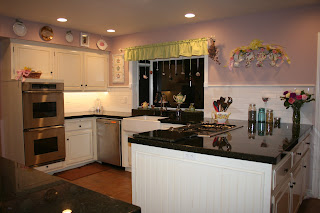
We’ll start with the full kitchen view.


We finally got the pretty stuff up.  After they touched up the paint last week, we were ready to put the pretty stuff back up in the kitchen.  I’ve had the teacup holder up in the kitchen for years.  My friend (and much needed advisor for interior design) painted it and I put on new ribbon and flowers.  We have the same tea cups, but I think I’m going to change one out when I find just the right replacement. 


The bay window looks great.  I made a new valance to add a little color. ($7 for a yard of fabric from the fabric store and 15 minutes of sewing.) It’s light green with white polka dots. And, I love the crystals and tea trinkets that are hanging from the window sill. The flowers hanging from the curtain rod are oregano blooms from my garden.  I need another bouquet to hang from the other side. 


We distressed the frame to the left of the window sill.  Actually, we ended up distressing a lot of frames that day.  It was great. Most of them are in different areas of the house, so you won’t see pictures here.  The kids wanted to help and when you paint on the white, it doesn’t actually have to be done well.  So, even the 4 year old was helping.  Then the bigger kids and I did the distressing. 


And, here’s a view of the full wall.


On top of the oven is a basket of our everyday vitamins.  It looks really cute and they’re easy to access.


And, here’s a snazzy feature.  The granite guys took the piece that they cut out for the cook top, cut it into two pieces, polished the edges and made cutouts on the bottom to make it easy to pick up.  I usually leave one on my counter.  But, when we have lots of people over for potlucks and such (which is usually at least twice a month), I can put the pieces on the cooktop and make more counter space.  It’s awesome!


I went to the open-air antique market today for some finishing touches.  I found this cute little thing. I’ll have to put some flowers in it. 


I also found this milk bottle from 1947 to add to my lineup.  I like the pink tint it has.


And, last but not least, I found a saucer to use as a spoon rest.  I want a couple more for the other counters in the kitchen. I’ll have to keep looking until I find just the right plates at just the right price.  I can get a beautiful saucer for cheaper than a spoon rest from Target. And, I couldn’t resist the cute little salt shaker with glass beads in it.  I found them in a shabby chic stand at the market today. I loved that stand.


So, that’s it for the kitchen blogs.  I feel so blessed to have this awesome kitchen and my wonderful  husband who pulled it all together.  And, I’m looking forward to sharing it with many people in the years to come.


Monday, January 23, 2012

Almost Finished!

The kitchen is now done, except for touching up the paint and putting the pretty stuff back up on the walls.  So, here is the House Beautiful photo shoot of the kitchen.  Trust me, it won’t look like this for long J These two photos show the big picture. Notice the subway tile backsplash and the chair rail, which wasn’t in before now. 


I have more space to store things in the kitchen, and a lot more counter space, so the counters are much clearer than they used to be.


This is the new working counter I’ve been so excited about.  Plenty of space to bake, prepare pizza and plenty of storage underneath for all the supplies. And, any pizza toppings that I’ve prepared on the stove are easy to grab from the pizza prep spot. 


Another view of the mega counter. We scooted the cooktop closer to the wall. It used to have a tiny little ledge next to it that was too small to be functional for anything. Now, it holds cooking supplies or the plate of heated tortillas for burritos quite easily.


This counter we extended and we added the cupboard at the end. That cupboard now houses the trash can. The trash can is much smaller than we're used to, so the kids will need to be emptying it more often. But, it looks great. And, one of those drawers is actually empty at the moment. That's amazing!


A view of the pantry. Yes, that’s two jars of Nutella.  Apparently, one of the kids couldn’t find the open jar (can’t blame them in the mess we had up until now) and opened the 2nd jar. So, we’re forced to eat them both J The LED lights in the pantry turn on when you open the pantry door.  Gotta love having an electrician in the house.


Magnetic switch and lighting from inside the pantry.


Knowing how much we use the sink, we opted for a Moen faucet. A Grohe was definitely out of our budget, but we didn't want to go with a cheap brand. There are some (many, actually) areas of the house that get way more use than the standard 4 person household where everyone goes to work and school during the day.  The sink is one of those.  We cook a lot. When I say cook, I don’t mean we heat things in the microwave.  We don’t even own one, actually. We cook from scratch all day, every day. And, as a result, we wash a lot of dishes.  So, we need a faucet that will stand up to that kind of use.


And now for some detail pictures.

I’m loving the mason jars for storage and for decoration. And, our chickens have been laying lately. Go figure. Chickens laying in January. But, I won’t complain.


Close up of the subway tile backsplash and the cute, yet functional, things on the counter.


Oil rubbed bronze hinges and drawer pulls.


Close up of cupboards and beadboard decoration. With the beadboard decoration and the great paint job, you would never guess that these cupboards were built in different decades.


The cutting boards were hard to grasp and pull out, so dh added some cute little drawer pulls to them to make it easier.


I must say, I love the granite.  It’s so beautiful. And, what counter is complete without a jar of olive oil.


LED under-cabinet lighting.


Dh also put the LED lighting in the storage pantry under the stairs. Plus, he added a couple of shelves on the wall.  They just happen to perfectly house my 1 gallon buckets.  I love the buckets, but I have to find a cuter way to label them.


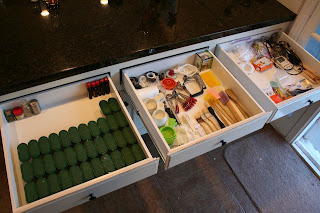
And, the working counter that I’ve been raving about perfectly houses all my baking supplies. The drawers have spices on the left (which now need to be labeled on top), basic baking stuff in the middle and rarely used stuff on the right.


The cupboards hold ingredients on the left , small appliances in the middle and rarely used stuff on the right (not pictured).  The Bosch Universal and the grain mill are used many times a week.


Here is a slightly more realistic picture of the kitchen in use.  The two little guys are helping me cook pizza for a birthday dinner.


And, since I have so much counter space, this counter is completely clear while we’re cooking pizza! This used to be my pizza prep spot and it was quite crowded. This time I used this counter for serving the pizzas when they came out of the oven.


I’ll do one more blog post on the kitchen remodel after the paint is touched up and the pretty things are back in place.